In many parts of the world, mobile phone numbers are increasingly intertwined with online services and personal identity. This is particularly true in mainland China, where a single user may find themselves managing multiple phone numbers for various applications and platforms. While solutions like telegram-sms and SMS-forwarder have emerged to address the inconvenience of managing multiple physical SIM cards, they come with limitations. These apps, typically installed on smartphones, are often hampered by aggressive background process management common on Android devices, leading to unreliable SMS forwarding. Furthermore, the practice of keeping older devices powered on long-term for this purpose introduces safety concerns, such as battery swelling. Perhaps the most significant limitation is the inability to handle phone calls; these apps only address SMS. This article details a project where the author, using an EC20 cellular module and a blend of software tools like asterisk, to overcame these limitations. The setup allows for SMS messaging through instant messaging applications like Telegram, and makes and receives phone calls over the internet using SIP clients, providing a more robust and flexible solution.
Other Solutions the Author Investigated
Multi-SIM Box (多卡宝)
A popular SIM card hosting solution one or two years ago, it could hold four cards and have two cards on standby simultaneously, forwarding SMS and calls using its own app. According to FCCID’s PDF, it uses a Qualcomm Snapdragon 210 processor, commonly found in some 4G feature phones. Therefore, the author suspects the multi-SIM box used a modified Android system. However, in the second half of 2021, multi-SIM boxes were removed from domestic e-commerce platforms, likely due to regulatory reasons (possibly being used for telecom fraud?). Also, because SMS and voice data must go through a third-party server, there are some security concerns.
GOIP Devices
Commonly known as “cat pools,” these devices are too expensive for the author to afford.
Materials and Costs
EC20 and Peripherals

A 4G card from Quectel that supports LTE Cat4 and uses the Snapdragon X5 LTE Modem. This card has several versions, some of which only support internet access and not calls or SMS. If you need to send/receive SMS and make calls, try to purchase the top-tier EC20CEFAG-512-SGNS, with a mini-pcie interface. It costs about 200 RMB from Quectel’s Taobao store, or about 50-60 RMB on Xianyu (a second-hand market).
Each card also requires a mini PCIE to USB adapter card with a SIM slot, which costs about 25 RMB. Search for “4G module adapter board Mini PCIE to USB” on Taobao. The card slot usually takes a Mini SIM, if you only have a nano SIM, you may need to buy a SIM adapter.
Additionally, you’ll need to buy some IPEX to SMA adapter cables and SMA interface 4G antennas, which can be found by searching those keywords on Taobao.
VM Host
The requirements are not high; generally, you just need a USB port and a wired network port. It’s recommended to install a virtualization system like PVE or ESXi. (Raspberry Pi may not work due to insufficient power). The author bought a second-hand Optiplex 3050mff with an i3-6100T, 8GB of RAM, and a 256GB SSD for about 600 RMB.
Configuring the EC20
Verifying the EC20 Can Read the SIM Card
Disable the SIM card’s PIN, insert it into the card slot, connect the EC20 to the antenna, and power it on. You should then see several ttyUSB ports in /dev:
ttyUSB0
ttyUSB1 PCM voice, GPS signal
ttyUSB2 Control commands
ttyUSB3
Use minicom to open the ttyUSB2 port:
minicom -D /dev/ttyUSB2

# Enter ATI to check the EC20's version:
ATI
Quectel
EC20F
Revision: EC20CEFAGR06A15M4G
If everything is normal, you can reset the EC20 first to prevent the previous user from having set incorrect configurations (but do not reset the EC20 too frequently, as the reset operation can wear out the dongle’s flash memory):
Reset module at+qprtpara=3
Restart AT+CFUN=1,1
After resetting and restarting, you can check if the SIM card has registered successfully using the following commands (the example below is for China Unicom; the same applies to other carriers):
AT+COPS?
+COPS: 0,0,"CHN-UNICOM",7

AT+QNWINFO
+QNWINFO: "FDD LTE","46001","LTE BAND 3",1650

AT+QENG="servingcell"
+QENG: "servingcell","CONNECT","LTE","FDD",460,01
Configuring VoLTE
With major carriers gradually phasing out 2G and 3G, configuring VoLTE for the dongle is becoming increasingly necessary. The following procedure refers to this PDF:
Enable IMS AT+QCFG="ims",1

View mbn files in the dongle AT+QMBNCFG="List"
+QMBNCFG: "List",0,1,1,"ROW_Generic_3GPP",0x05010824,201806201
+QMBNCFG: "List",1,0,0,"OpenMkt-Commercial-CU",0x05011510,201911151
+QMBNCFG: "List",2,0,0,"OpenMkt-Commercial-CT",0x0501131C,201911141
+QMBNCFG: "List",3,0,0,"Volte_OpenMkt-Commercial-CMCC",0x05012011,201904261

# Although it lists VoLTE configuration files for China Mobile, China Unicom, and China Telecom, using the default automatic selection of CU/CT/CMCC cannot register VoLTE. After a long period of experimentation, the author found that forcing the selection of ROW_Generic_3GPP is necessary to register VoLTE successfully.

Disable automatic mbn selection AT+QMBNCFG="AutoSel",0
Deactivate current mbn at+qmbncfg="deactivate"

Force selection of 3gpp AT+QMBNCFG="select","ROW_Generic_3GPP"
Restart AT+CFUN=1,1

You can check the mbn selection status again. If the second and third digits of ROW_Generic_3GPP are both 1, it indicates that the dongle has selected this configuration. AT+QMBNCFG="List"
+QMBNCFG: "List",0,1,1,"ROW_Generic_3GPP",0x05010824,201806201
+QMBNCFG: "List",1,0,0,"OpenMkt-Commercial-CU",0x05011510,201911151
+QMBNCFG: "List",2,0,0,"OpenMkt-Commercial-CT",0x0501131C,201911141
+QMBNCFG: "List",3,0,0,"Volte_OpenMkt-Commercial-CMCC",0x05012011,201904261

After restarting, check the IMS status AT+QCFG="ims"

If it returns +QCFG: "ims",1,1, it's enabled. If it returns +QCFG: "ims",1,0, it's not enabled.
Optional (Activate UAC Digital Audio)
Refer to https://github.com/IchthysMaranatha/asterisk-chan-quectel/discussions/2:
AT+QCFG="usbcfg",0x2C7C,0x0125,1,1,1,1,1,0,1
This command will also open an adb daemon. You can use adb shell to enter the module’s built-in Android system. If the system has a password (whether or not it has a password does not affect subsequent configurations), you can use adb pull to pull the dongle’s /etc/passwd, remove the root password, and then push it back.
After activation, you can check if there is an Android device by using aplay -L.
dmix:CARD=Android,DEV=0
    Android, USB Audio
    Direct sample mixing device
Installing the Asterisk Virtual Machine
FreePBX’s built-in Asterisk is tightly coupled with FreePBX configurations, making it difficult for the author to use. Also, CentOS doesn’t seem to be able to read the dongle’s UAC interface. Therefore, the author configured a simple Asterisk system based on a discussion by the Quectel channel driver author. The author uses Debian 11 here and installs the Asterisk 16 included in the package manager. After installing Asterisk, remember to pass through the dongle’s USB interface into the virtual machine.
Installing Asterisk and Some Dependencies
apt update
apt install asterisk asterisk-dev adb git autoconf automake libsqlite3-dev build-essential libasound2-dev alsa-utils
Downloading asterisk-chan-quectel:
git clone https://github.com/IchthysMaranatha/asterisk-chan-quectel
cd asterisk-chan-quectel

./bootstrap
./configure --with-astversion=16
make
make install
Then, copy uac/quectel.conf to /etc/asterisk. Restart Asterisk using systemctl restart asterisk.
Enter Asterisk’s CLI interface using asterisk -rvvv and enter quectel show devices. You should see the identified dongle, including its IMEI and the SIM card’s IMSI:
# asterisk -rvvv
Asterisk 16.16.1~dfsg-1+deb11u1, Copyright (C) 1999 - 2018, Digium, Inc. and others.
Created by Mark Spencer <[email protected]>
Asterisk comes with ABSOLUTELY NO WARRANTY; type 'core show warranty' for details.
This is free software, with components licensed under the GNU General Public
License version 2 and other licenses; you are welcome to redistribute it under
certain conditions. Type 'core show license' for details.
=========================================================================
Connected to Asterisk 16.16.1~dfsg-1+deb11u1 currently running on debian-asterisk (pid = 1403)
debian-asterisk*CLI> quectel show devices
ID           Group State      RSSI Mode Submode Provider Name  Model      Firmware          IMEI             IMSI             Number
quectel0     0     Free       27   0    0       CHN-UNICOM     EC20F      EC20CEFAGR06A15M4 86XXXXX  46XXXXX  Unknown
debian-asterisk*CLI>
Configuring the Dialplan
Directly refer to the post written by the driver author and download the sipext.zip from that post. Extract it and place the files in /etc/asterisk. At the same time, modify /etc/asterisk/extensions.conf (please do not copy directly! Modify according to your situation and the driver author’s post):
[incoming-mobile]
;exten => _.,1,Dial(SIP/70/100)
;same => n,Hangup()
exten => sms,1,Verbose(Incoming SMS from ${CALLERID(num)} ${BASE64_DECODE(${SMS_BASE64})})
;store
exten => sms,n,System(echo '${STRFTIME(${EPOCH},,%Y-%m-%d %H:%M:%S)} - ${QUECTELNAME} - ${CALLERID(num)}: ${BASE64_DECODE(${SMS_BASE64})}' >> /var/log/asterisk/sms.txt)
;for tg bot use
exten => sms,n,System(echo '${STRFTIME(${EPOCH},,%Y-%m-%d %H:%M:%S)} - ${QUECTELNAME} - ${CALLERID(num)}\n${BASE64_DECODE(${SMS_BASE64})}' >> /var/log/asterisk/unread_sms/${STRFTIME(${EPOCH},,%Y%m%d%H%M%S)}-${CALLERID(num)}.txt)
exten => sms,n,Hangup()

exten => ussd,1,Verbose(Incoming USSD: ${BASE64_DECODE(${USSD_BASE64})})
exten => ussd,n,System(echo '${STRFTIME(${EPOCH},,%Y-%m-%d %H:%M:%S)} - ${QUECTELNAME}: ${BASE64_DECODE(${USSD_BASE64})}' >> /var/log/asterisk/ussd.txt)
exten => ussd,n,Hangup()

exten => _.,1,Dial(SIP/70/100)
exten => s,n,Hangup()


[Outbound-1001]
exten => _.,1,Dial(Quectel/quectel0/${EXTEN})
same => n,Hangup()
After modifying, restart Asterisk again.
Testing Sending and Receiving SMS
You can try sending an SMS to 10010 at this point to test sending and receiving messages:
Sending SMS (send “cxll” to 10010)
asterisk -rx 'quectel sms quectel0 10010 "cxll"'
Receiving SMS
According to the previous dialplan, after receiving an SMS, Asterisk will directly write the SMS content into /var/log/asterisk/sms.txt, which will look something like this:
tail -f /var/log/asterisk/sms.txt

2022-10-01 00:00:00 - quectel0 - 10010: 【权益领取提醒】尊敬的用户,您已获得2个月视频会员体验资格(原价15元/月),腾讯、爱奇艺、优酷、芒果TV、QQ音乐等20款会员每月任选1款,点击 https://u.10010.cn 即可参与(活动规则详见页面说明,限48小时内参与,短信转发无效,已办理请忽略)。如需屏蔽,请在“广东联通”官方公众号内回复“TD”,首次关注可领4GB流量【广东联通】
If you need to further forward the SMS, just read this file, or modify the output format of the SMS in the dialplan.
Using a Telegram Bot for Self-Service SMS Sending and Receiving
The following scripts are all written with ChatGPT, and the author has not encountered any obvious problems using them for the time being:
Sending SMS
Systemd service:
[Unit]
Description=Outbound SMS service for TG-SMS
Wants=network-online.target
After=network-online.target

[Service]
Type=simple
ExecStart=/opt/tg-sms/outbound/.venv/bin/python3 /opt/tg-sms/outbound/outbound-sms.py
Restart=on-failure
RestartSec=5
User=asterisk

[Install]
WantedBy=multi-user.target
Script (you need to install the old version of python-telegram-bot pip install python-telegram-bot==13.15):
from telegram import Update, ForceReply
from telegram.ext import Updater, CommandHandler, MessageHandler, Filters, CallbackContext

# We'll use a dictionary to store each user's state.
user_data = {}

# List of allowed user/group IDs.
ALLOWED_IDS = [11111111]

def send(update: Update, context: CallbackContext) -> None:
    if update.message.chat_id not in ALLOWED_IDS:
        update.message.reply_text('您没有权限使用这个 bot。')
        return

    if len(context.args) != 1:
        update.message.reply_text('请按照以下格式发送命令:/send <phone_number>')
        return

    user_data[update.message.chat_id] = {'phone_number': context.args[0]}
    update.message.reply_text('请输入您要发送的信息:', reply_markup=ForceReply())

def cancel(update: Update, context: CallbackContext) -> None:
    user_data.pop(update.message.chat_id, None)
    update.message.reply_text('操作已取消。')

def handle_message(update: Update, context: CallbackContext) -> None:
    if update.message.chat_id not in user_data:
        return

    if 'message' not in user_data[update.message.chat_id]:
        user_data[update.message.chat_id]['message'] = update.message.text
        update.message.reply_text('请确认信息:\n手机号:{}\n信息:{}'.format(user_data[update.message.chat_id]['phone_number'], user_data[update.message.chat_id]['message']), reply_markup=ForceReply())
    else:
        confirmation = update.message.text
        if confirmation.lower() == 'yes':
            import os
            result = os.popen('asterisk -rx \'quectel sms quectel0 {} "{}"\''.format(user_data[update.message.chat_id]['phone_number'], user_data[update.message.chat_id]['message'])).read()
            update.message.reply_text('命令执行结果:\n{}'.format(result))
        else:
            update.message.reply_text('操作已取消。')
        user_data.pop(update.message.chat_id, None)

def main() -> None:
    updater = Updater(token='your_token', use_context=True)

    dispatcher = updater.dispatcher

    dispatcher.add_handler(CommandHandler("send", send))
    dispatcher.add_handler(CommandHandler("cancel", cancel))
    dispatcher.add_handler(MessageHandler(Filters.text & ~Filters.command, handle_message))

    updater.start_polling()

    updater.idle()

if __name__ == '__main__':
    main()
Receiving SMS
import requests
import sys
import urllib.parse
import re

# extract verify code
def extract_verification_code(sms_text):
    # 定位到“验证码”关键词
    keyword_index = sms_text.find('验证码')
    if keyword_index == -1:
        return None

    # 从关键词后开始匹配4-6位的数字
    match = re.search(r'(\d{4,6})', sms_text[keyword_index:])
    if match:
        return match.group(1)
    return None

# tg
tg_bot_token = ""
tg_send_msg_url = "https://api.telegram.org/bot"+tg_bot_token+"/sendMessage"
tg_receive_msg_url = "https://api.telegram.org/bot"+tg_bot_token+"/getUpdates"
# wecom
wecom_send_msg_url = "https://qyapi.weixin.qq.com/cgi-bin/webhook/send?key=your-key"
bark_send_msg_url = "https://api.day.app/bark-token/"

def incoming_sms_tg(msg_text):
    send_body = {}
    send_body['chat_id'] = '11111111'
    send_body['text'] = msg_text
    requests.post(tg_send_msg_url, json=send_body)

def incoming_sms_wecom(msg_text):
    send_body = {}
    send_body['msgtype'] = 'text'
    send_body['text'] = {}
    send_body['text']['content'] = msg_text
    requests.post(wecom_send_msg_url, json=send_body)

def incoming_sms_bark(msg_text):
    requests.get(bark_send_msg_url + urllib.parse.quote_plus(msg_text) +
                 "?copy=" + extract_verification_code(msg_text))

def incoming():
    msg_text = sys.argv[1]
    incoming_sms_wecom(msg_text)
    incoming_sms_bark(msg_text)
    incoming_sms_tg(msg_text)

incoming()
Installing the FreePBX Virtual Machine
Download the FreePBX ISO image from the official FreePBX website (it appears to be a CentOS 7 system): https://www.freepbx.org/downloads/. Install the system using the image, choosing freepbx 16 with asterisk 18 during the installation. After installation, access the virtual machine’s IP in a browser and set the initial administrator password (you can temporarily not open the firewall at the beginning for easy configuration).
Adding an Extension Number
In Applications - Extensions, click “add extension” - SIP extension, and add an extension with the number 200 (the number is arbitrary as long as it doesn’t clash with the numbers in the Asterisk virtual machine):
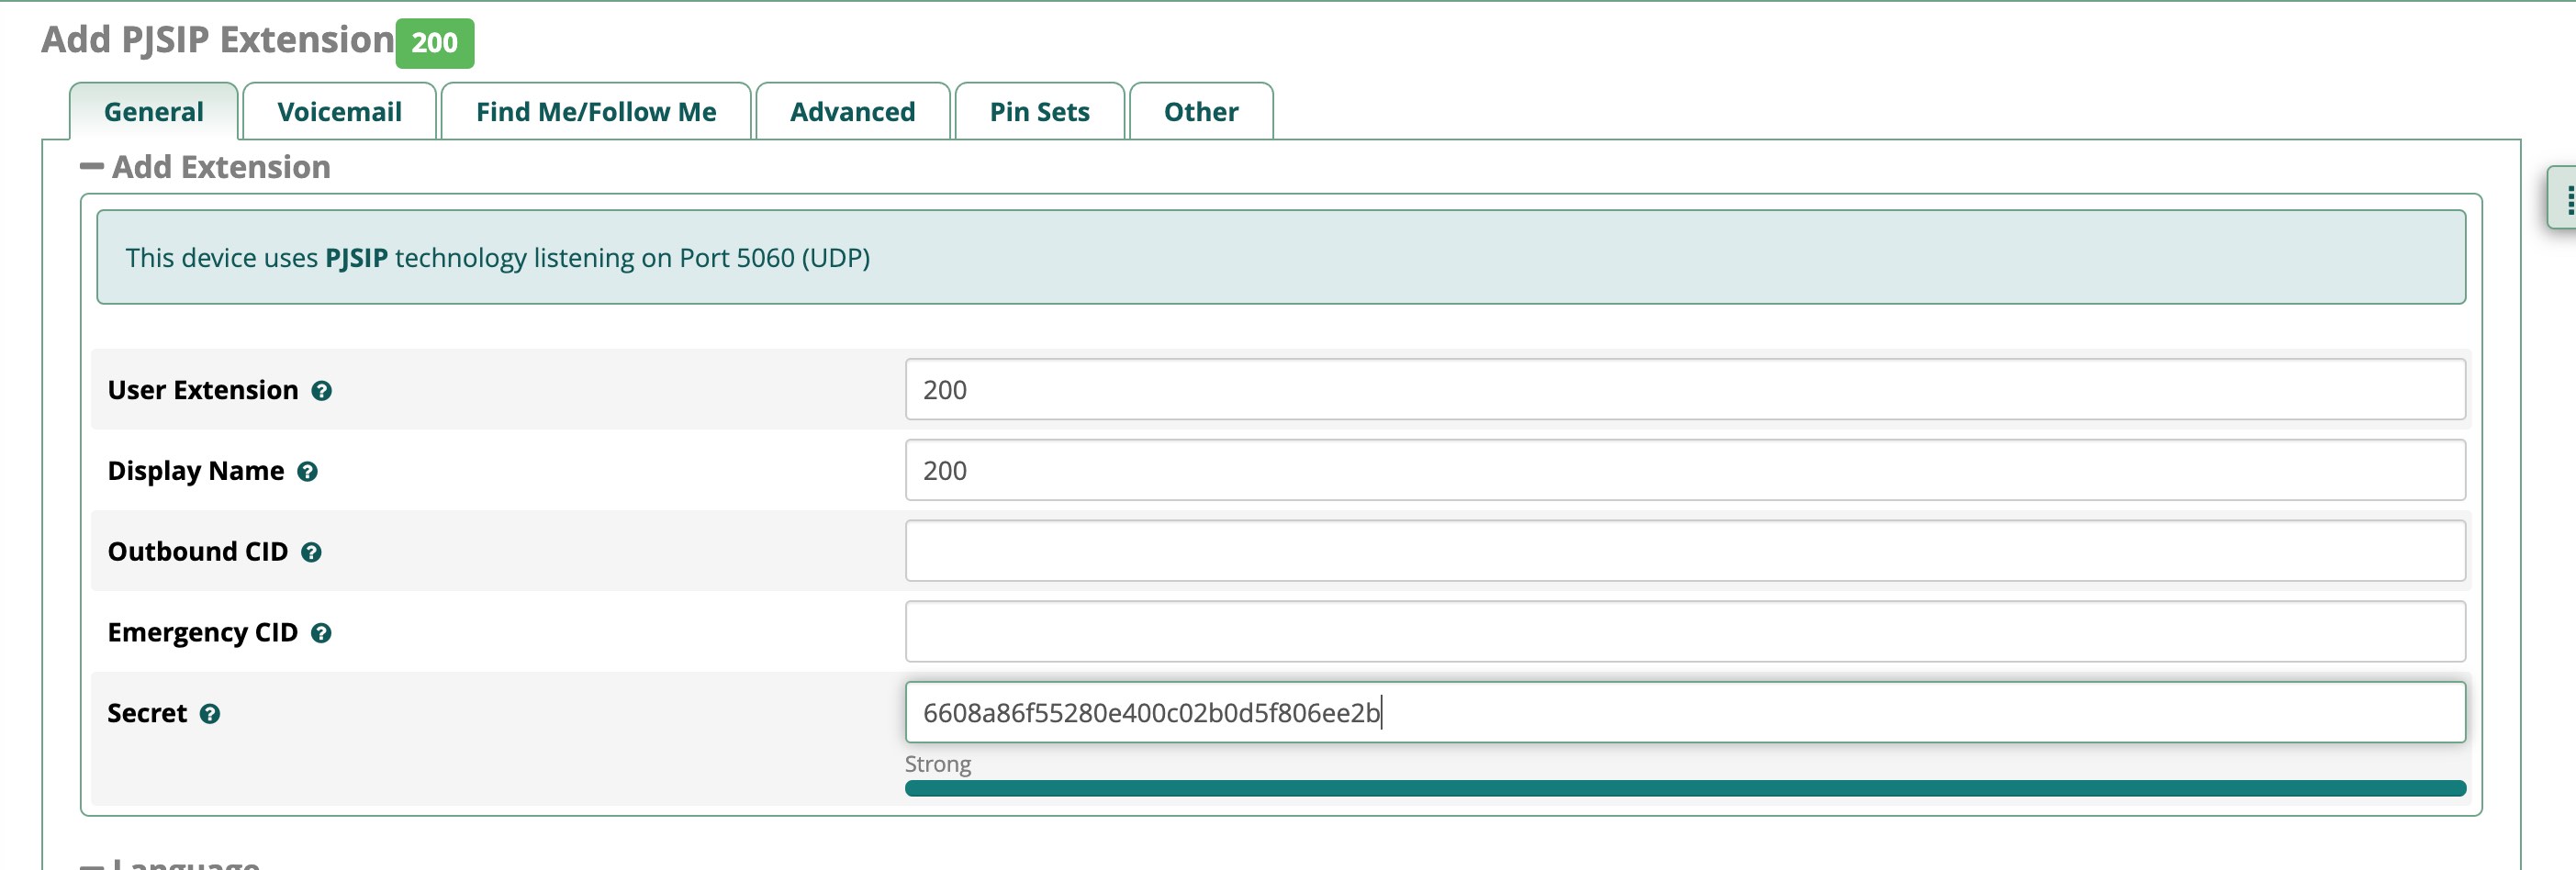
Keep the rest as default, click “submit,” and then click the apply config button in the upper right corner.
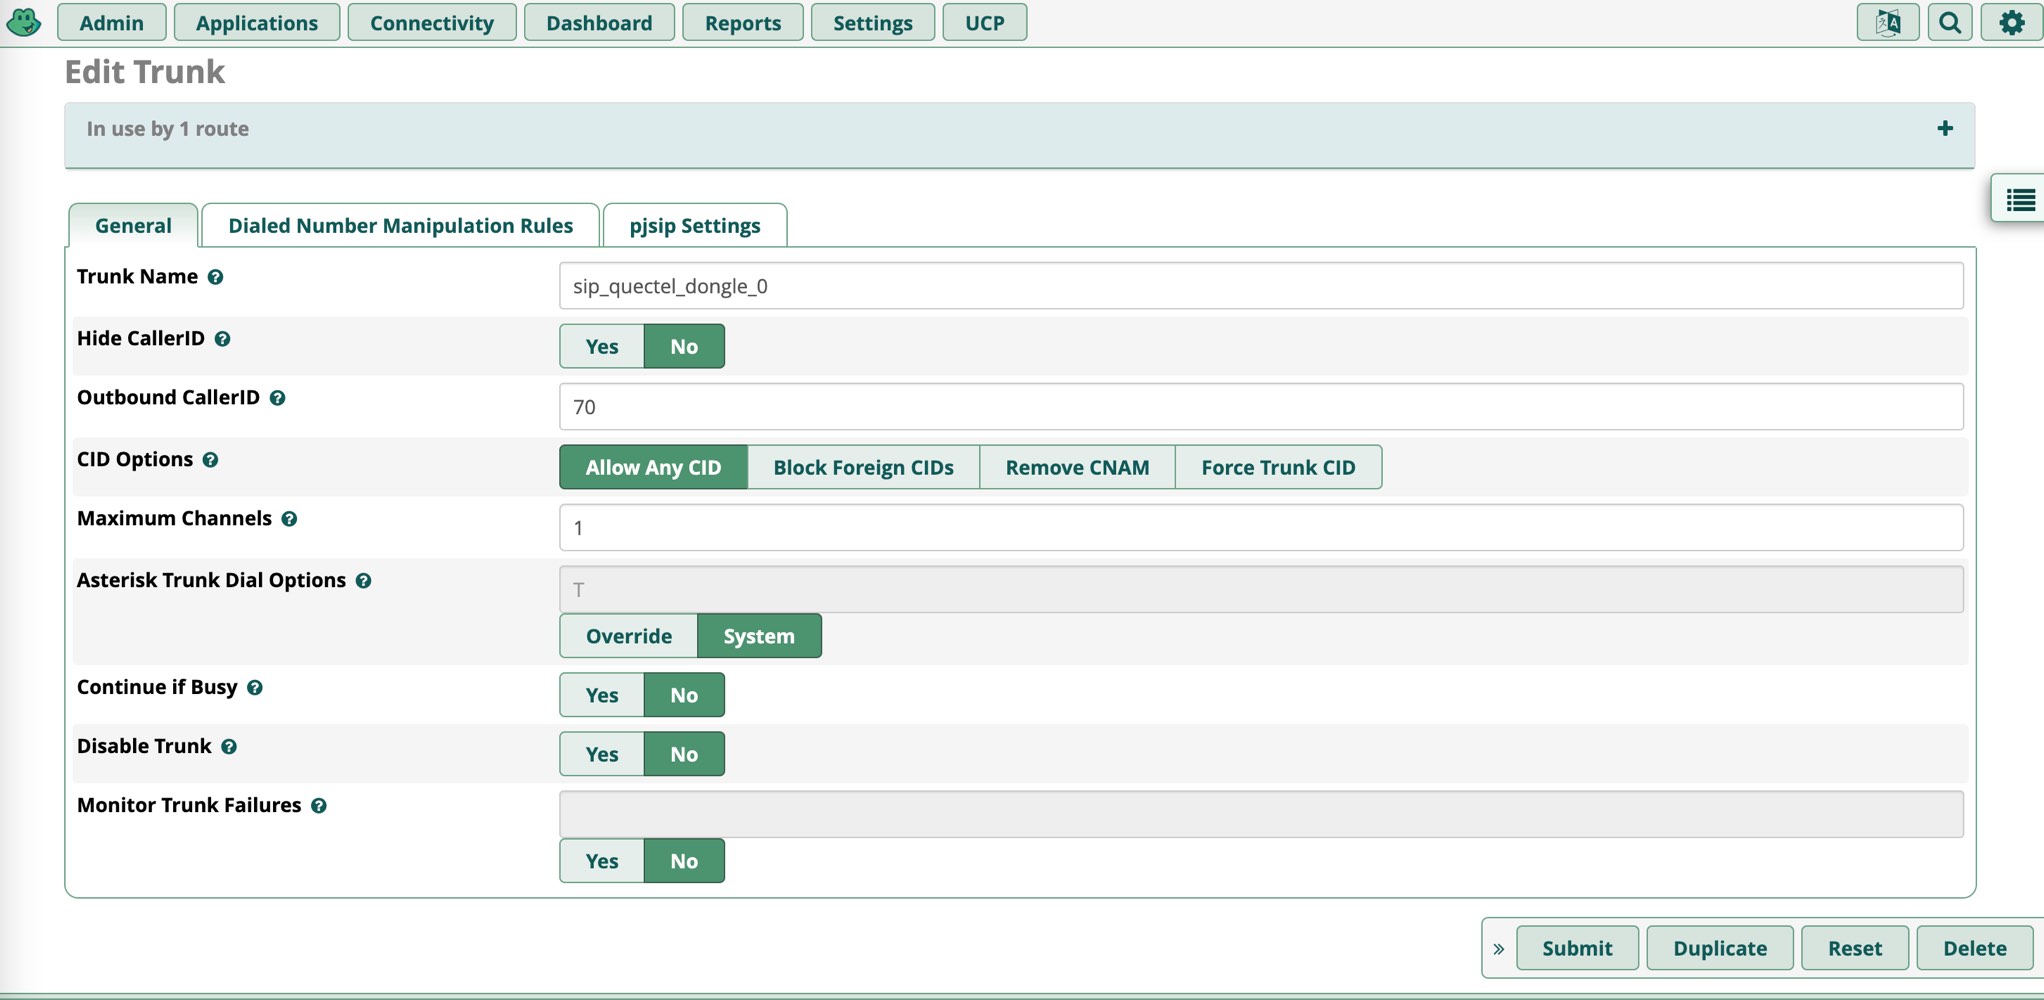
Adding a Trunk
Before adding, first, follow the instructions in the previous post, modify /etc/asterisk/sip.conf in the Asterisk virtual machine, changing the host=192.168.x.x of the bottom 70 extension to the IP of the FreePBX virtual machine, and restart Asterisk.
In FreePBX, under Connectivity - Trunks, add a SIP Trunk. Configure it as follows, with other settings at default:

Routing
In Connectivity - Outbound Routes, create a new route and forward all outbound routes to the SIP trunk created in the previous step:
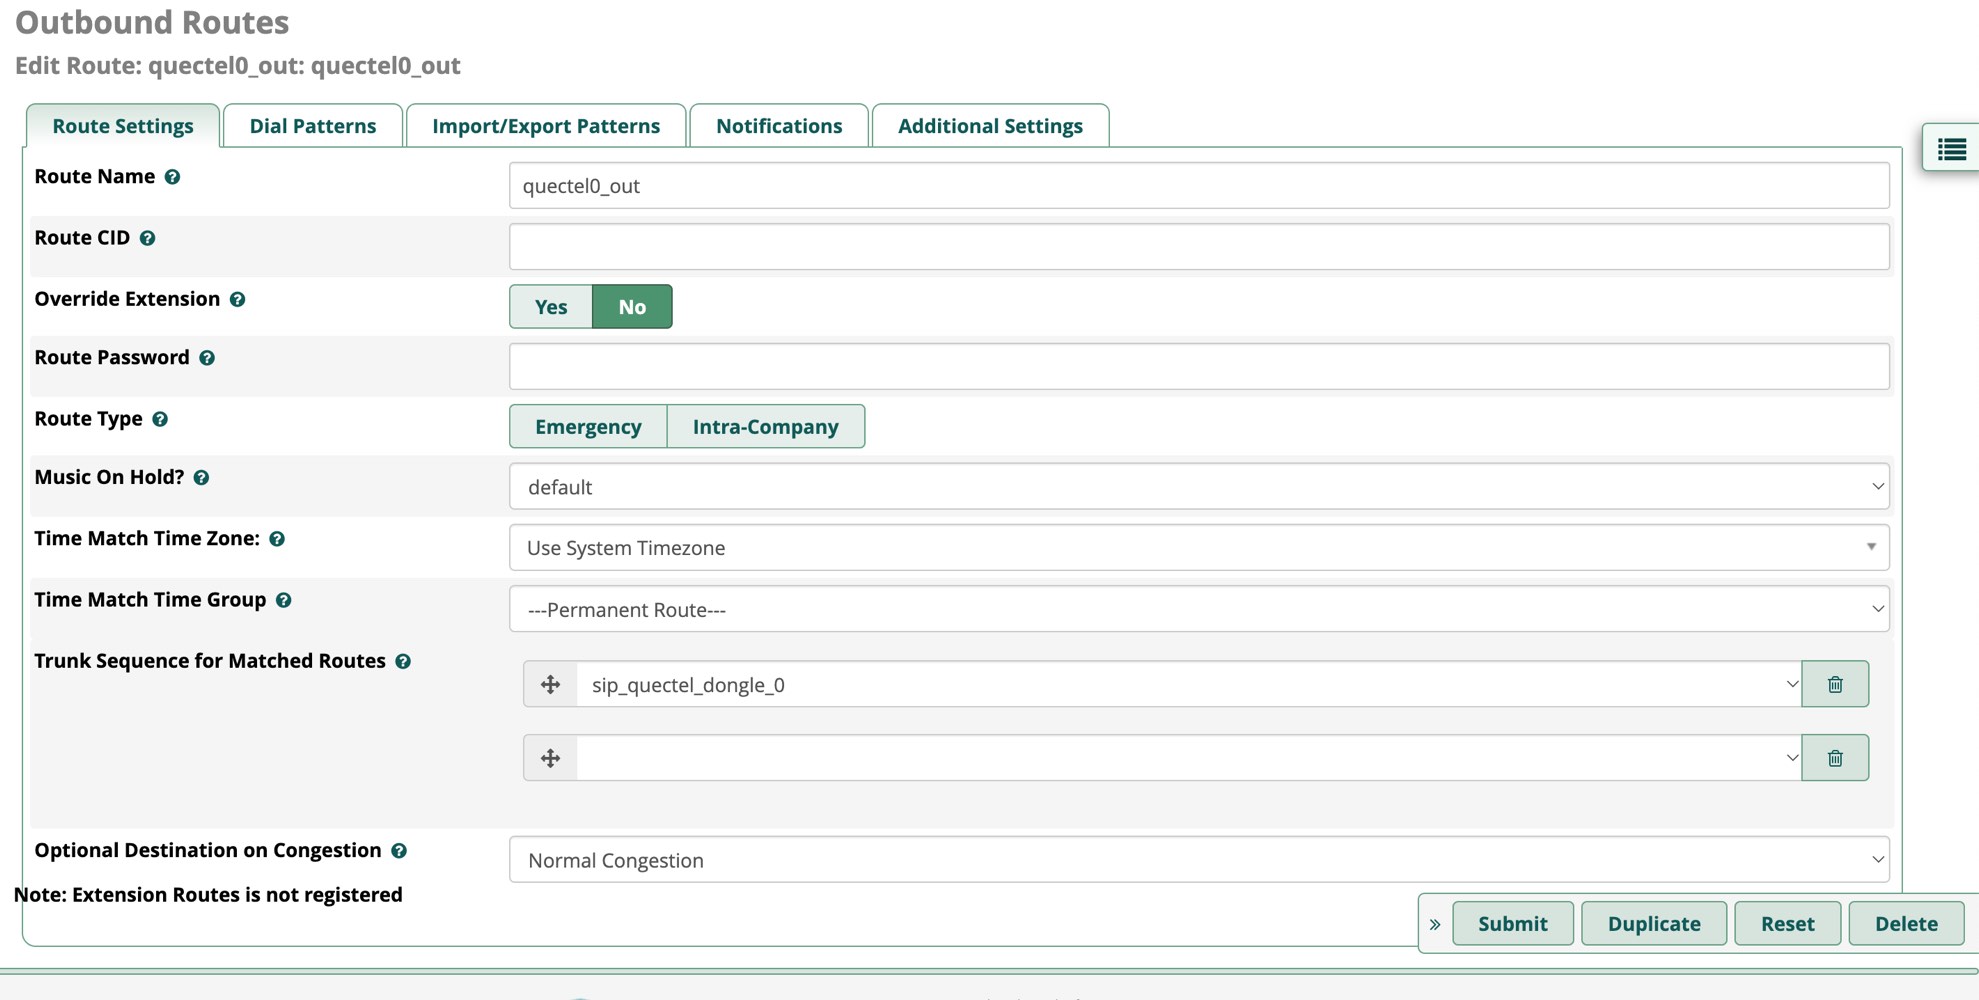
In Connectivity - Inbound Routes, create a new route and forward all inbound routes to the extension number set above:
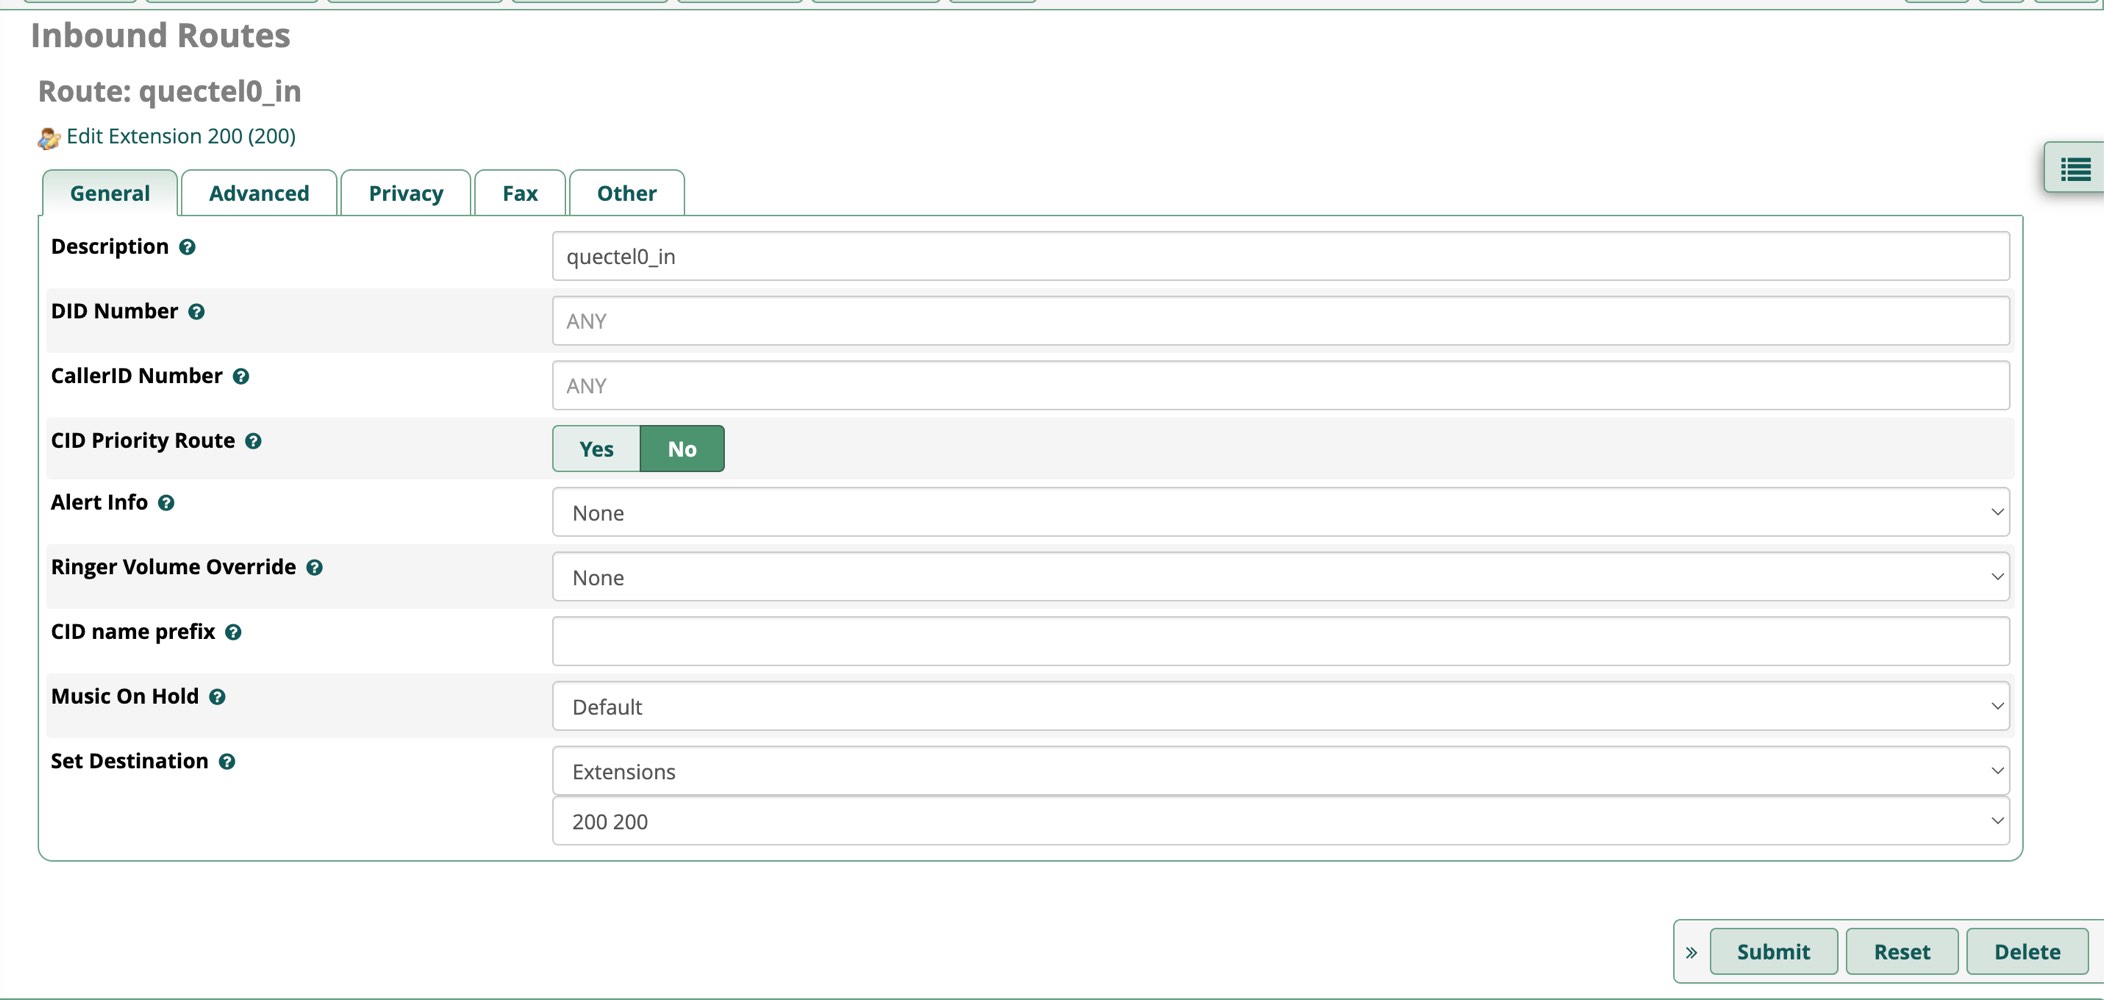
If you connect multiple extensions or multiple dongles in the future and need to route calls based on the user, you can configure the above DID and CallerID to filter calls in detail.
Testing Calls
Download a free version of zoiper. When adding an account, enter the username as extension number@FreePBX's IP, and the password as the one set above (make sure you do not enter it incorrectly; FreePBX has fail2ban enabled by default. Entering the SIP password incorrectly will also trigger fail2ban, and you will need to manually delete the iptables rules).
After confirming registration, try calling 10010 or your own phone via Zoiper to test if voice and DTMF tones are recognized. If an incoming call to the dongle’s number comes into FreePBX, it will be directly transferred to the extension, at which point Zoiper will give you a prompt. You can answer the call at that point.
Port Forwarding, SIP Push, etc.
For SIP, in addition to forwarding the default SIP port (5201, you can view this in FreePBX settings under settings - asterisk sip setting), you also need to forward RTP ports. If you only want to forward one port, you can consider using an IAX2 extension, referring to EC20 Module + Issabel for VoIP - Hanako Blog. For SIP Push (displaying a push notification on your phone when a call is received), currently only Zoiper provides a more convenient way to configure it, but it requires payment. Refer to How to Get Rid of the SIM Card From Your Phone – IAM-LC for details.
Using the Module for Internet Access
If the SIM card you’re using has a data plan, you can also configure the module for internet access. This ensures that SMS forwarding and calls can continue normally if the machine’s wired/wireless network goes down.
First, after connecting to the serial port, enter AT+QCFG="usbnet",1 to set the usbnet mode to ECM (1 for ECM, 2 for NDIS, and 3 for RNDIS).
Then, restart the module using AT+CFUN=1,1 and check ip a. You should see an interface similar to enxe2eeabcd123. You can run dhclient directly on this interface to obtain a v4 or v6 address. If you’re concerned about the interface name changing frequently, you can refer to this question to rename the interface based on the MAC address to something more manageable like quectel-usbX.
3: quectel-usb0: <BROADCAST,MULTICAST,UP,LOWER_UP> mtu 1500 qdisc fq_codel state UNKNOWN group default qlen 1000
    link/ether ff:ff:ff:ff:ff:ff brd ff:ff:ff:ff:ff:ff
    inet 192.168.225.41/24 brd 192.168.225.255 scope global dynamic quectel-usb0
       valid_lft 28802sec preferred_lft 28802sec
    inet6 2408::/64 scope global dynamic mngtmpaddr
       valid_lft forever preferred_lft forever
    inet6 fe80::/64 scope link
       valid_lft forever preferred_lft forever
Misc
- When the SIP client is not open (or in background), calls to the dongle will indicate that the user is busy. You need to use the SIP push method mentioned in the previous section or keep the client open to receive calls normally.
References
- The EC20 AT command set can be downloaded from https://www.quectel.com/ProductDownload/EC20.html.
- Quectel driver on Asterisk: https://github.com/IchthysMaranatha/asterisk-chan-quectel/
- https://gao.md/blog/2014/10/05/sms-gateway-setup-huawei-e1750-asterisk-chan-dongle/
- https://iam.lc/2024/01/how-to-get-rid-of-sim.ping
- https://forums.quectel.com/t/ec25-e-mini-additional-mbn-files/13473/2
